Naijatechworld: Blogger Tips
Showing posts with label Blogger Tips. Show all posts

Monday, August 22, 2016

Best 4 Blogging Platforms to Start a Blog for Free

Hello guys, It’s been a while I updated this blog, this is because of some private reasons and tight schedules.Ok today I will be treating a very disturbing Topic which answers the question always asked by those that want to start up a blog. “The new bloggers” So I will be writing on the Best 4 Blogging Platforms to Start a Blog for Free. Many people always inbox me on facebook asking what is the best blogging platform to start a blog with low cost? So I have decided to make a post on it today.
Read More »

Friday, February 5, 2016


The facebook share button picking the wrong post thumbnail has been a great problem for many bloggers.
 So have you noticed an incorrect facebook share button post thumbnail showing up when you share your articles on Facebook? I have gotten some emails and complains from my readers and in this article, I will help you fix the facebook incorrect thumbnail issue in Blogger.
Facebook Incorrect Post Thumbnail Issue in Blogger

But first of all Let us look at:

Why Facebook is Not Picking up The right Thumbnail Image

Facebook post share button not picking up the right thumbnail has many reasons. One of the first most common reason is having multiple images set in the og:image tag where you have your featured image smaller than rest of your other images in Wordpress Blogger but for the purpose of this course, I will focus on  How to fix Facebook Incorrect Post Thumbnail Issue in blogspot Blogger.
The Second reason why Facebook post share button not picking up the right thumbnail could be from your blogger template. Many blogger template developers makes some silly errors and do not perform very well in XML or html coding and thereby compound a crappy blogger templates with errors. And when a newbie downloads these templates, they will be faced with this type of problem. So your non premium blogger template can also be  reason for this issue because of  its wrong coding by unprofessional developers and webmasters.
So how do we solve this problem?

How To Fix Facebook Wrong Picture Thumbnail Issue In Blogger Template

To fix this problem, Follow the steps bellow, you have to add some codes to your blogger template. So follow the below given simple steps to Avoid No Thumbnail Issue While Sharing Post on Facebook.
  • Go to your blogger dashboard:
  • Remember to back up your Template.
  • Go to Template >> Edit >>Html:
  • Press CTRL  F
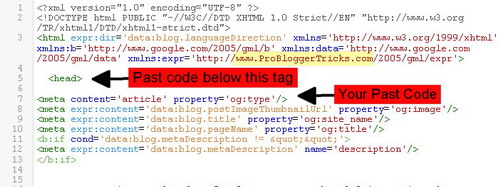
  • And look for  <head> tag  In the template:
  • Now Paste the bellow code just after the  <head> tag:
<meta content='article' property='og:type'/><meta expr:content='data:blog.postImageThumbnailUrl' property='og:image'/><meta expr:content='data:blog.title' property='og:site_name'/><meta expr:content='data:blog.pageName' property='og:title'/><b:if cond='data:blog.metaDescription != &quot;&quot;'><meta expr:content='data:blog.metaDescription' name='description'/></b:if>
Facebook Incorrect,Post Thumbnail

  • Save Your Template


What You should know After Customization

Just before ending this post I think you should know this important Tips.
After correcting this problem of  Facebook Incorrect Post Thumbnail Issue in Blogger all your new posts from now will show correct picture thumbnail in facebook whenever you share the post.
You have to wait for like 3 to 4 days for your old posts to the correct Post thumbnail. Also note that you have to add the same code each time you change your blogger template.

Bonus tips and tricks To Show Right Post Image Thumbnail In Facebook

  • I just felt like sharing these basic blogger tips and tricks that will guide you on how to insert image in the right way inside blogger post. 
  • I recommend you use PNG format for your main post image. Then you can use JPG image format for the rest of image you will insert in your post. 
  •  Make you of image tags and do not resize your image automatically inside your post.
  • Share your post on face immediately after publishing.


Conclusion:
Hope I have been able to help you through this article to resolve Facebook incorrect / no thumbnail issue in Blogger.  I know how frustrating this problem is, after composing your post, now to share to facebook which is a big source of traffic, and you got yourself stuck on this issue. Well I believe you have found solution today.
Please comment is it worked for you. If you still have any issue on this please do not hesitate to use the comment box.  
Share this post please..
Read More »

Saturday, July 25, 2015

In this post , I will share with you a very beautiful blogger blogspot Archive Widget that will make your blog stand out among others and also for better SEO..

Want to learn more about blog SEO? Read this post " HOW TO INCREASE SEO FOR YOUR BLOG "

Back to the Topic.

So What is Blog Archive and Why Should You Add it to your website or Blog.?


Blog archives simply serves as the nucleus and history of your blog. As a blogger , you publish new posts frequently and while you do so, your new posts appears on your blog's home page and you will notice that your older post will be very difficult to locate. 
At this point is where the Blogger Archive come in, with this widget , you can always find your older blog posts online with ease. Many blogging platforms has this widget already intact for users to add but the one i will share with you is more precise and looks good and well organised.

It has some division such as: Post Titles, Post Dates and Post Labels, unlike the default blogger Archive widget..

Why Blog Archives Is Important..

Firstly , blog archive gives your blog good credibility in a way that visitors will see your blog post that was made may be 2 years ago and this will give them a great instinct to trust and value your blog over others that have little post in them.
Archives also help your visitors to navigate easily and locate a post or similar post that might be important to them.. 
Ok, with that little description above I hope you now know what blog Archive means and why you should add it to your blog or blogspot.

How To Add Stylish Archives widget to your blog.
= Login to your blogger account and go to pages
= Click on New page

= Title your new page with " Archives"  click on HTML and copy and paste the code bellow 


<style scoped="scoped" type="text/css">

/* CSS Sitemap Archive Page */
#bp_toc {background:transparent;width:100%;color:#999;margin-top:10px;margin:0 auto;padding:5px;}
.toc-header-col1 {padding:15px!important;line-height:15px;background-color:#555;width:250px;transition:all 0.3s ease-in-out;}
.toc-header-col2 {padding:15px!important;line-height:15px;background-color:#333;width:75px;transition:all 0.3s ease-in-out;}
.toc-header-col3 {padding:15px!important;line-height:15px;background-color:#111;width:125px;transition:all 0.3s ease-in-out;}
.toc-header-col1:hover, .toc-header-col2:hover, .toc-header-col3:hover {opacity:0.9;}
.toc-header-col1 a:link, .toc-header-col1 a:visited, .toc-header-col2 a:link, .toc-header-col2 a:visited, .toc-header-col3 a:link, .toc-header-col3 a:visited {font-size:15px;text-transform: lowercase;text-decoration:none;color:#fff;font-family:&#39;Roboto Slab&#39;;font-weight:400;letter-spacing:0.5px;}
.toc-header-col1 a:hover, .toc-header-col2 a:hover, .toc-header-col3 a:hover {
text-decoration:none;}
.toc-entry-col1, .toc-entry-col2, .toc-entry-col3 {padding:10px;font-size:92%;;transition:all 0.3s ease-in-out;}
.toc-entry-col1:hover, .toc-entry-col2:hover, .toc-entry-col3:hover {background:#fdfdfd;}
.toc-entry-col1:nth-child(odd), .toc-entry-col2:nth-child(odd), .toc-entry-col3:nth-child(odd) {padding:10px;font-size:92%;}
.toc-entry-col1:nth-child(even), .toc-entry-col2:nth-child(even), .toc-entry-col3:nth-child(even) {padding:10px;font-size:92%;}
.toc-entry-col1 a, .toc-entry-col2 a, .toc-entry-col3 a{text-decoration:none;color:#666;transition:all 0.3s ease-in-out;}
.toc-entry-col1 a:hover, .toc-entry-col2 a:hover, .toc-entry-col3 a:hover{color:#8493A5;}
span.toc-note {padding:10px;margin:10px 0;display:inline-block;background:#fff;
color:#666;}
#bp_toc table {width:100%;margin:0 auto;border-collapse:collapse;border-spacing:0;border-color: transparent;}
#bp_toc tr:nth-child(even) {background:#fafafa}
#bp_toc tr:nth-child(odd) {background:#f5f5f5}

/* CSS Bounce To Top */
#BackToTop {background:#8493A0;display:none;color:#fff;padding:13px 16px;
font-size:16px;line-height:30px;border-radius:100%;opacity:0.7;transition:all .3s linear;}
#BackToTop:hover{opacity:1;transition:all .3s linear}
.BackToTop {-webkit-transform: translateZ(0);cursor:pointer;position:fixed;bottom:30px;right:30px;z-index:90;}

/* Custom CSS for Pass Strength */
input#pwd {width:50%;color:#666;border:1px solid #e5e5e5;padding:5px;margin:20px auto;float:none;}
#pwd_strength_wrap {background:#fcfcfc;border:1px solid #e5e5e5;border-radius:2px;display:none;float:left;padding:15px;position:relative;width:auto;box-shadow:4px 4px 0 #f5f5f5;}
#pswd_info ul {list-style-type:none;margin:5px 0 0;padding:0;}
#pswd_info ul li {color:#308cf4;background: url(https://blogger.googleusercontent.com/img/b/R29vZ2xl/AVvXsEiAN526edGuZ6VR_uim6Q4oelI-Fkd3yV-ZL65mIGCdLU6R_aeVaZy1OID_3SXrTGsR5DH1KfRx8RE1_N7E6_3EwZ8kIL4ydu5QXTaHUHnxDWW82D4u43sAVi2SqVzqP7Q-F7-QRJECyhmi/s1600/icon_pwd.png) no-repeat left 2px;padding:0 0 0 20px;opacity:0.8;}
#pswd_info ul li.valid {opacity:1;background-position:left -42px;color:#bbb;text-decoration:line-through;}
#passwordStrength {display:block;height:5px;margin-bottom:10px;transition:all 0.6s ease-in-out;}
.strength0 {background:none;width:0px;}
.strength1 {background:none repeat scroll 0 0 #FF4545;width:25px;}
.strength2 {background:none repeat scroll 0 0 #FFC824;width:75px;}
.strength3 {background:none repeat scroll 0 0 #6699CC;width:100px;} 
.strength4 {background:none repeat scroll 0 0 #008000;width:150px;}
</style>

<br />
<div id="bp_toc">
Loading Sitemap. Please wait....</div>
<script src="https://ismoothblog.googlecode.com/svn/sitemap-archive-page.js" type="text/javascript"></script> <script src="/feeds/posts/summary?alt=json-in-script&amp;max-results=9999&amp;callback=loadtoc" type="text/javascript"></script>


= Then click on Publish and your are good to go..
I hope this helps. Please don't read alone, this post might be useful to your friend or someone out there do SHARE please...
If you encounter any problem on the course of implementing this code do let me know through the comment box..
Read More »

Saturday, June 27, 2015

increase-seo-for-your-blog-or-website

5 Best Ways To Use Links In Your Blog


What you are about to read now will help your blog seo. And I have used this tips and it worked for me and i believe it will work for you too. Here , I will be showing you, the Best way to Use Links In Your website or blog and why you should use them that way.

I discovered this trick while working for some companies and I must tell you, I charge extra money for this link management and seo .

Ok Lets go to the Deal.

What Is The Best Way To Use Link In My Website/Blog?

=>Don’t make use of the work “ Click Here” for your links, they should be at most 2-5 words. Always make sure that it’s related to what is on the other side of the link. i.e ( You can Know, You can watch the tutorial etc)

=>Make your link to be outstanding, it should have many colours. Also note that your blog or website home page links should be realistic,( concern with pragmatic and sensible things)

=>Be specific to your readers, do not put them in a state of recon i.e ( make them guess where your link is point ), Make it known to them that when they click the link it will take them to the page you told them. If it is an affiliate link make them know. Make your link to be specific.

=>Make use of log files to see what your users are searching for, and make use of popular words for your links. Also title tags will help your blog visitors or users to know where they are going so it is very important you make use of [ title = Anchor text ]

=>Finally, don’t make use of “Open in a new window” when inserting your links, your website users can always the back button. Another very important point is link testing. Make sure you test your links in different browsers before publishing your post to avoid broken links as this will save you a lot of money.

I think I should stop here for the moment. I will still write more on link building and integration, but am happy you have learnt something new today, based on the correct ways to insert links in your blog.
Have a question? Please use the comment box bellow and don’t read alone, share this post with your friends...
Read More »

Wednesday, April 8, 2015

increase-seo-of-my-blog-website-improve-my-seo

Top 5 Tips That Will Improve Your Search Engine Rankin


Do you want to improve your search engine visibility? Then, search Engine Optimization is the strategy that you require which I will reveal to you in this post.

What is search Engine Optimization or SEO?

Search Engine Optimization or SEO are basic strategies that are used to improve search results for your website or blog when someone searches for a particular keyword. In my post today you will find 5 basic and powerful search engine Optimization Ideas or Tips that you can implement on your website or blog to improve your ranking.

1. Make Use Of The Right Keywords


One of the most important factors of search engine ranking is keyword. If you make use of common Keywords phrases, then it’s very unlikely that you will rank well. To rank well, try to use a definite keyword phrase rather than single keywords. With this, you have a greater chance of ranking high for a specific phrase of less competition. And you should also expect targeted increase in traffic with this strategy.

2. Insert Keywords In Your H1,H2 and H3 headings


Review your page Layout, and insert relevant keywords in your web pages title [ H1 heading ] and also into the subtitles on the page [ H2 & H3 ]. Make use of keywords in your headings as it is the major focus of search engines; Search engine makes use of them as their major signal to the main subject of the page. It is also important to make use of short paragraphs bullet points ,so your readers will find it easy to read your written content. 

3. Make Use Of Website Image Tag.


Website images cannot be read by search engines, but they can read the Explanations/Descriptions that you give to your images. The word Image“alt text” is used as an image text substitute on a web page. The “alt image tag” these are the words that your visitors reads each time they move their cursor over an image in your website, in other words search engines also read those words. Therefore make sure you tag your website images with relevant keywords.


Article directories are some of the most visited sites on the planet and backinks from them show the search spiders that your website has valuable content and the more relevant backlinks your website has, the better your search rankings will be.

4. Create Backlinks

Also Read: 5 Best Ways To Use Links In Your Blog

Article marketing is also a great way on how to improve website or blog ranking. This Ranking tip works well when you compose an article and add a link back to your blog, search engine recognises this as a backlink. Backlinks from article directory websites which are the most popular visited website in the world will indicate to the spiders that your website is rich with valuable contents and the more your blog backlinks the better is will rank high in search engine.

5. Create High Quality Content.


Users search for answers / information through the search engine, therefore search engine provides to them links to the information they are searching for. So your website must be rich with useful, relevant and frequently updated with quality content for people to read not just search engine. And remember not to flood your blog or website page with keywords for it not to be blacklisted as spam and will probably be ignored by any search result..
Read More »

Saturday, March 21, 2015

This Post is to show how you can create and submit a site map to google.. But First ,
What Is Google Sitemap?.

Google site map is a file in XML  format that contain all your website links or pages.. Its a great seo tool for webmasters as it makes google to be aware of all your website pages.

I also want to make it known that submitting your sitemap to Google does not guarantee site/blog ranking .. Its just for Google to have access to your pages for crawling ..

How DO I Create A Sitemap..

> If you make use of Wordpress blog, there are many Seo Plugins that can automatically create and submit your site map to google such as All in one Seo Plugin , it will do all the work for you.

> If your make use of blogger blog, like this one , then your need to create an account in Google Webmaster Tool , then Login into your account with blogger/site details.. Go to the sitemap link and you shall find some useful details and instructions to create your sitemap .

> Those with static website, then you need to Create your sitemap manually..
You can do that by using an Online Sitemap Generator ,

NOTE:

Remember you need to create Webmaster Tool Account before you can submit your site and also verify the ownership of your site , its only then you will be able to submit your site map manually.

How to Submit Your Sitemap To Google..

Sign in to your webmaster Tool account, click on Crawl and Select site map.

Click On Add/Test Sitemap 

Next is to submit the file name of the sitemap you created , it will look like SITEMAP.XML


please if you make use of WordPress plugin in creating your sitemap, go to the plugin settings in the admin panel. You will find the name of the sitemap there.

When you are done then, click and submit the sitemap and you have successfully created and submitted your sitemap to google! Now Google has an up-to-date listing of all your pages.

Google will automatically re-crawl your site once you make any new update...

Hope this helps, Please share 
Read More »

Sunday, February 15, 2015

Here is the end of your search..
I spent hours trying to find where to get godaddy.com real and working coupon promo code.. To be sincere its never easy to find a real working one..
But after many hours of searching I succeeded and that is what am about to reveal to you so that you will not spend your time searching again ; I have done that for you.

How I Bought 2 years domain name with just $10 from Godaddy

Actually this blog will take a new name in no distance time.. Yes i will tell you the reason soon.
I just bought a new domain from godaddy and after implementing the promo code , I was marveled at the great discount i got.. Before was $16 but after I implemented the promo code the cost was reduced to $10 thats is $6 off.. Is that not great..? Am sure you are waiting to here the link to the coupon promo code..

Why you Should Buy A Domain name From Godaddy.

Here are few tips why you should buy a domain name from godaddy.
1. It is owned by Google:- Yes www.godaddy.com  is owned by google the top web search engine. I tell you for better seo and search engine optimization I recommend you used them because they will optimize you domain to their search engine and also to yahoo and bing..
2. Domain Security:- They also offer the best protective domain security service. They will protect your domain identity from the web.

There are many other benefits and reasons to use godaddy.. But i just have to stop here..
Now You can get many godaddy coupon codes upto 85% discount coupon codes HERE

To use the coupon code, when you might have gotten your preferred domain name or web hosting , just before you finalize your payment, scroll down at the left side you will see where to insert your promo code.. See sample picture bellow


Insert the promo code you got from the link i gave you and Click on APPLY.. You will be amazed at the great discount you will get..

I have to Stop here.. I hope this helps.. SHARE, And COMMENT pls..

In my next post i will share to you why i decided to change my domain name [www.bloggercheat.com]. Stay tuned..
Read More »

Monday, February 2, 2015


The purpose of this post is to show you how you can share your new blog post automatically to Google+ without viewing the post..

What is Google+

Google+ (or Google Plus) is a social media networking and identity service that is owned and operated by Google Inc.. I will not talk more on Google+ because I know as a blogger with your Gmail account ,that you already have a Google Plus account..

Google+ is also one of the Top means to rank your blog in search Engine.. I will Talk about that later

Follow this steps to share your New blog Post Automatically to Google+ at the point of publication.

How To Share Post To Google+ Automatically

1. Visit www.blogger.com/home and sign in.
2. Select your blog from the dashboard
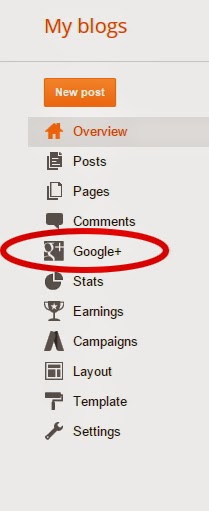
3. On your Blog Dashboard select the Google+ Icon Located at the left hand side..( see picture Sample Bellow)


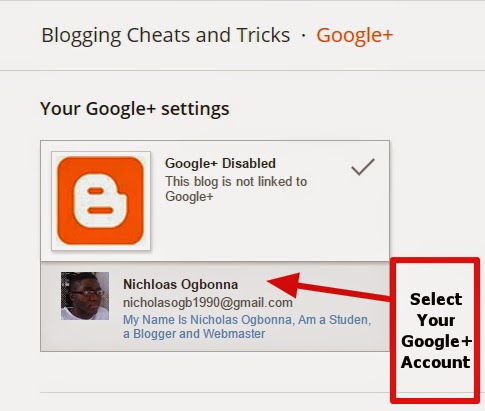
4. After that, Link and Select your Google account ,If you have may account just select  the one you will like to use..

5. Note: If you You are using Blogger As Default then you have to link your Google+ account With blogger before this step.
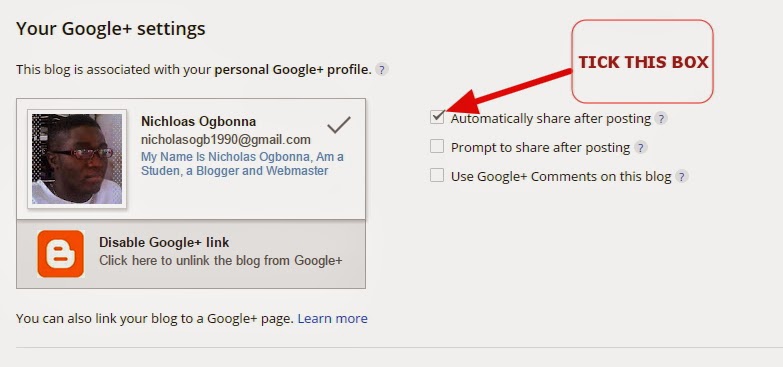
6. You will notice a small box by the left hand side when you select your google plus account.
7. Tick the box with ''Automatically Share After Posting''


That is all, no need of viewing the post then clicking on share buttons any more . Because you can do it automatically. I hope this Helps.. Comment And Share

Read More »

Monday, January 26, 2015


When you start a blog, figuring out the most common ways of increasing
blog traffic should be at the top of your To-Do list.
You can spend hours and hours putting together the most exciting, attractive, and content rich blog ever in the history of blogs. But, unless you get the word out that it exists, no one will ever see the fruits of your labor.
And, if you are trying to make money blogging, you won't have any visitors to click on your affiliate links, buy the products you’re promoting, and line your bank account with commission checks.
So getting traffic to your site is important. And here are three simple ways to do it.

Article Marketing
Article marketing is one of the most tried and true methods of getting more traffic to any type of website, including blogs.
All you have to do is write a series of articles related to your topic. And they don't have to be very long. At many article directories, the minimum length for articles is 200 to 250 words.
After you have written your articles, submit them to article directories. Some of the most popular options are Ezine Articles, GoArticles, and Article Dashboard.
In the author's bio box, include a link back to your site, along with something that will make the reader interested in seeing what your blog has to offer.
Submitting articles to article directories is a quick and easy way to dramatically increase the number of visitors to your blog.

Social Bookmarking
At social bookmarking sites, you can share links to articles and other useful or interesting online content. When you post a link to one of your blog posts at a social bookmarking site, you are exposing it to hundreds, or even thousands, of people who could end up following that link and visiting your site.
You should get into the habit of bookmarking your best posts at some of
the big social bookmarking sites like Digg, Reddit, StumbleUpon etc

SEO Techniques
Another way to get more traffic to your blog is by applying SEO (Search Engine Optimization) techniques to your posts. These techniques can help your blog rank higher in the search engines for certain keywords. The higher a site ranks, the more likely it is people looking for info on that topic
will visit that site.
When writing a blog post, make sure a keyword or keyword phrase is used in the title and the first paragraph, as well as being sprinkled throughout the post. If possible, you should also use the keyword in the page’s meta tags.
Learning some simple methods of increasing blog traffic is an important step in becoming a successful blogger. And, by using these three easy techniques, you will quickly increase the number of visitors who will be dropping by to take a look at your blog.

Hope this Helps

Read More »

Thursday, January 15, 2015

What Is Custom Permalink In Blogger?

This is a Seo feature added by blogger in 2012 that enable bloggers to customize their blogger post URL before publishing it..
I make use of this feature every time i compose a post.  This  makes me to customize/ generate a URL that is related to my post before I publish it, to provide readers with relevant information especially when scanning through Search Engines results.
Failure to do this at time , blogger may automatically generate a URL that is completely irrelevant for your blog post.

How To Use Blogger Custom Permalink

To create your own custom permalink, url for a specific post, Simply Click on Compose a new post , then enter your desired post title .

Click on "permalink" in the Post Settings.

incease-blog-seo-tips-blogger-permalink-naijatechworld.com

Allow Blogger to Auto Generate a url then click on Custom Permalink as shown in the image above.
You should see an editable permalink generated by blogger, you can then edit as desired.

When you have finished editing click DONE.

 That's All


PLEASE NOTE


> Separate each word with -
> Avoid words like "of", "the", "is", "from" etc
> The shorter, the better.
> Each blog post must have a unique permalink.
> You can't edit permalink of an existing post. It's only for new posts.


I hope this helps.
Read More »

Wednesday, November 12, 2014

After some request from my friends, grumbling that their blog readers are finding it hard to post comment on their blog basically on the grounds that the Blogger comment structure won't show on mobile much in the wake even on clicking the "post a comment link"

Most times this is basically accomplished on websites that have changed to Blogger custom portable format. Albeit, I don't generally realize what causes the issue yet there is an answer, which I've chosen to impart to you in this post.

To settle the issue, you just need to add the css beneath to your Blogger blog's html. On the off chance that you see your blog entries in the wake of sparing the progressions to your html, you ought to see the comment structure showed straightforwardly underneath each one post regardless of the possibility that the post has zero comment.

How To Add the css code to my blog

Simply follow the my steps bellow.

== Login to www.blogger.com/home and click on your blog on the dashboard.
== make sure you Back your Template Up
==Click on Template
==Click on edit Template
==click inside the HTML and press Ctrl F and find ]]></b:skin>   

.blogger-iframe-colorize {
display: block !important;
} 

== Paste the css code just above it see picture bellow

 == Click on save Template and you are Done..
Comment and Share let me know if it worked for you..


Read More »

Wednesday, November 5, 2014


Backing your blog template is a very important thing to do for every blogger.  It will help you to revert any bad changes you made in your blog that you might not like. all you need to do is to restore the back up.
Your Blogger template back up will also be handy in situations whereby you want to revert your blog back to an old design after uploading a new template

Backing up your blog is made easy by blogger.. Just follow the simple steps bellow.

==> Sign in to www.blogger.com/home and select your blog in the dashboard.
==> Click on "Template"


==> Click on the the "Backup/Restore" located at the top right corner.


==> A pop-up window will appear ( see the image bellow for sample).


==> Click on the "Download Full |Template"
==> Choose where you want to save the template in your computer and click the Save button

You can rename it ,to include the date and time you created the backup.. You can also upload it to the cloud such as Dropbox, Mediafire,google drive etc for easy assess whenever you need it.
Read More »

Saturday, October 11, 2014


If you are interested in SEO for your blog then you are definitely interested in whether or not the blogs that you are commenting on are “NoFollow” or “DoFollow” blogs.

What’s the big deal about that? There is a lot of buzz around the blogging world on this topic – and for good reason!
We have plenty of reasons for wanting to comment on other blogs and one reason is
definitely to get the back link. What many people don’t realize (I know that I didn’t!) is
that not all blogs are set to give you the back link that you want. Those blogs are
called NoFollow. The blogs which do give the back links are called DoFollow.
If you are using a self-hosted WordPress blog then you need to know that your blog is
automatically set up as a NoFollow blog! That was certainly news to me when I found
that out! I thought the complete opposite, that WordPress was set up as a DoFollow

blog.

I thought that I was giving back links to all of my commentors! On the bright side I
have had comment luv up and running since the get-go so at least I’ve been giving
them some advertising even though I wasn’t giving them the back links.

There’s a plug-in for that!

I you make use of wordpress Go to your plug-in page and and find the plug-in conveniently called “DoFollow” and install and activate it and you will be hosting a DoFollow blog! That was easy!

BUT make sure that you have also activated an anti-spam plug-in. My personal
favorite is WP-SpamFree so find it also and install it. Some people
also like the Captcha plug-in but I am not a fan. Seriously, it’s not needed if you use
WP-SpamFree.

Thanks for reading , do share and comment let me know your view..
Read More »

Saturday, August 23, 2014


Hello Friends, in this post you will learn the things you must go for before choosing a blog theme. What you Must go For.
There are thousands of themes available for WordPress  or Blogger, and it can be very difficult to choose the right one if you’re not quite sure what to look for.
Read More »

Sunday, August 17, 2014

Going with the recent growth on online business, Many Companies and individuals  are now moving their Business online..
Its your time to join the moving train.. If you have a little business you do why not try and move it online.. You can start with just a free blogger..
Read More »

Friday, August 15, 2014


Hello thanks for visiting. In this post you will understand and also learn the things you must know before choosing a custom domain for your Blog..
Read More »

Friday, July 11, 2014

There’s really 4 primary strategies for getting Amazon Reviews.

1. Organically wait for people to post reviews.
The first strategy is the most passive approach to getting reviews, which is
waiting for the reviews to organically appear. The problem with this
strategy is that without having reviews for your book, nobody will buy them.

Read More »

Sunday, July 6, 2014


On this Post I have Decided To Show to my Friends How to Add Facebook comment to their blog.. As requested..

Just follow the steps bellow as i will be Descriptive as as i can...

Follow it step by step:
Read More »


The most popular and rather straightforward way of making money on the internet is by becoming an affiliate marketer. As an affiliate, you will be given a link which you will promote. Your primary responsibility would be to drive people to your merchant’s site through your link. You can promote anything under the sun. From ebooks to hard goods like computers and LCD Flat screens etc.
Read More »

Wednesday, June 25, 2014


In this lesson we’ll begin to do the keyword research for your list of
potential niches that you came up with in the previous lesson. We’ll begin
to narrow your list down to the best three, then finalize the best one that
you’ll move forward with creating a book on through the rest of this
program.
Read More »